
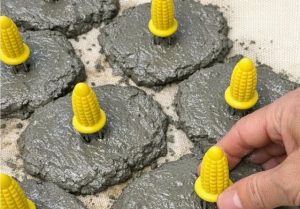
Enhancing your outdoor living space, garden pathways, and backyard landscaping does not have to require expensive professional contractors or luxury materials. With a little creativity, some basic concrete mix, and unexpected household items like corn cob holders, DIY enthusiasts can create stunning, custom garden stepping stones.
In recent years, budget-friendly home improvement hacks have gained massive popularity among homeowners looking to personalize their yards while keeping costs low. Crafting your own concrete pavers allows you to design unique textures, shapes, and patterns that perfectly complement your outdoor aesthetic.
This comprehensive guide explores innovative DIY concrete casting techniques, step-by-step instructions, safety guidelines, and practical landscaping tips to elevate your garden.
The Ingenuity of Creative Concrete Casting
Why use everyday household tools for concrete projects? Standard commercial pavers often look uniform, plain, and expensive. By experimenting with molds, stamps, and household utensils, you can introduce custom textures and functional grips into your concrete creations.
Using Everyday Items as Creative Tools
-
Textured Surfaces: Pressing objects into semi-set concrete creates unique non-slip textures and visual patterns.
-
Integrated Handles or Stakes: Inserting small utensils or holders into wet concrete pads can serve temporary casting functions or create decorative accents for custom garden art pieces.
Step-by-Step Guide: How to Make Custom Concrete Stepping Stones
Creating durable, professional-looking stepping stones at home is a rewarding weekend project when following proper techniques.
1. Preparation and Materials
-
Gather Supplies: You will need quick-setting concrete mix, water, a mixing bucket, a trowel, a mold or flat casting surface covered with plastic sheeting, and your decorative or shaping tools.
-
Safety Gear: Always wear rubber gloves and a dust mask when mixing dry concrete to protect your skin and respiratory tract.
2. Mixing and Pouring
-
Mix to the Right Consistency: Combine the concrete mix with water in your bucket until it reaches the consistency of thick peanut butter.
-
Pour and Settle: Scoop the concrete onto your prepared casting surface, shaping it into uniform pads or rounds. Tap the mold gently to release any trapped air bubbles inside the mixture.
3. Adding Textures and Curing
-
Incorporate Details: While the concrete is still wet and pliable, press your chosen decorative items, molds, or texture tools into the surface.
-
Curing Time: Allow the stepping stones to cure undisturbed for 24 to 48 hours, keeping them slightly damp by misting with water to ensure maximum structural strength.
Financial Savings and Landscaping Benefits
Investing your time into DIY landscaping projects yields significant economic and aesthetic advantages.
Lowering Hardscaping Expenses
-
Affordable Materials: Bags of concrete mix are inexpensive compared to pre-cast stone pavers purchased at retail garden centers.
-
Custom Fit: Handmade stones can be cast in exact sizes to fit narrow garden beds, winding pathways, or unique backyard layouts.
Important Safety Guidelines and Precautions
Working with concrete requires adherence to basic safety measures:
-
Skin Protection: Wet concrete is highly alkaline and can cause skin irritation or chemical burns. Always wear waterproof gloves and long sleeves when handling wet mixtures.
-
Proper Ventilation: Mix concrete outdoors or in a well-ventilated garage to avoid inhaling fine cement dust.
Interesting Facts About Concrete and Pathways
-
Ancient Concrete Durability: The ancient Romans used volcanic ash in their concrete mixes, creating structures like the Pantheon that have survived for over two millennia.
-
The Evolution of Walkways: Garden stepping stones date back centuries, originally used by historical horticulturists to protect delicate soil and plant roots from foot traffic.
Conclusion: Transform Your Garden Today
Creating custom concrete stepping stones is a fantastic way to combine creativity, practicality, and budget-friendly home improvement. By utilizing simple household items and following proper casting techniques, you can build a personalized garden pathway that lasts for years.
Try this clever DIY concrete trick in your own backyard and enjoy a stunning outdoor upgrade!
Frequently Asked Questions (FAQ)
How long do DIY concrete stepping stones need to dry before use?
Concrete typically requires at least 48 hours to cure enough to handle, and up to 7 days to reach full structural strength before being walked on heavily.
Can I add color to my homemade stepping stones?
Yes! You can mix powdered concrete pigments or liquid colorants into your wet mixture to create custom shades ranging from earthy terracotta to slate gray.
How do I prevent my concrete stepping stones from cracking?
Prevent cracking by avoiding excess water in your mix and keeping the curing concrete moist by covering it with plastic or misting it with water during the first two days.
